Freestyler VI Electro version

Eisen

User
Hi to all fans of F3X models, hope you weren´t be annoyed due to my english, sorry for that.
But I believe that for most of pilots will be this buildlog useful.

After long thinking about right plane for new category F3G,
I made decision for FS6, due to lots of experinces from well known team www.tud-modelltechnik.de.
They confirm their quality by numerous winnig in close category F3B and F3F for long time.

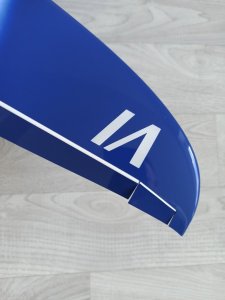
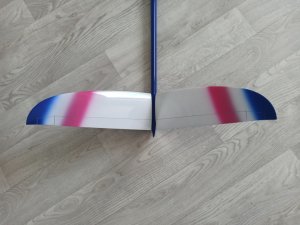
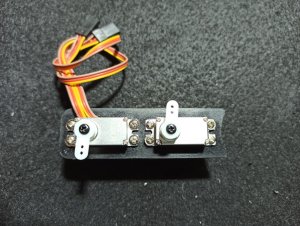
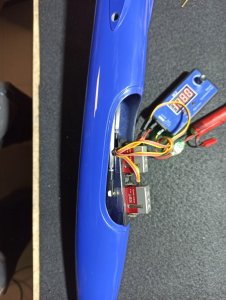
At the beginnig some photos,.
Build log will be follow, stay tunned
smile.gif


Milan
 

Anhänge

  • IMG_20201226_133037.jpg
    IMG_20201226_133037.jpg
    128,1 KB · Aufrufe: 234
  • IMG_20201226_133101.jpg
    IMG_20201226_133101.jpg
    100,6 KB · Aufrufe: 193
  • IMG_20201226_133132.jpg
    IMG_20201226_133132.jpg
    64,4 KB · Aufrufe: 171
  • IMG_20201226_133139.jpg
    IMG_20201226_133139.jpg
    224 KB · Aufrufe: 153

Eisen

User
My Idea was have it plane close to rules of F3G, that means minimum wing loading 35g/dm2.
rolleyes.gif

I told it to Franz Demmler from Tud-modelltechnik and he offer me Double carbon
popcorn.gif
electro version.
Layup of wing is outside 24 glas/62 HM Spread-tow, inside 40 Carboline and Herex .

Weight of parts:
Left wing 580g
Right wing 600g
Center joiner 122g
Fuselage+cabine+rod 262g
V-tail 32,5g+33g

I hope that will be with weight on the limit for F3G or slightly over.
About placement of equipmnets in fuselage I will make final decision after I will have any idea about right CG with my power setup.

Milan
 

Anhänge

  • IMG_20201223_083036.jpg
    IMG_20201223_083036.jpg
    271,2 KB · Aufrufe: 180
  • IMG_20201223_083143.jpg
    IMG_20201223_083143.jpg
    321,9 KB · Aufrufe: 158

Eisen

User
I started with placing of servos into fuselage.
smile.gif

I used all parts delivered with my model (3D-printed servo tray, plastic clevis from MP-JET, plastic eye from ball links)
There isnt´t lots of things what to say about that, I hope is all clear from photos, only glued some parts and make proper length of pushrods.
wink.gif

I used KST servos KST DS215MG V3 which are little bit bigger and heavier than others producers use into their models, but this type of servos are little bit faster and stronger.
biggrin.gif
(servo tray is designed for this type of servos
cool.gif
) I used shorter servo arm on first hole, deflection is big enough without any grinding of plastic clevis. Servo tray go inside of holder which must be glued before, position is holding by next 3d printed part which isn´t on photos.
I want lock it later, because still don´t know, where I place receiver, that means direction of power cables of servos is still open
smiley35.gif


Milan
 

Anhänge

  • IMG_20201223_100014.jpg
    IMG_20201223_100014.jpg
    335,6 KB · Aufrufe: 248
  • IMG_20201223_101948.jpg
    IMG_20201223_101948.jpg
    124,2 KB · Aufrufe: 255
  • IMG_20201223_102523.jpg
    IMG_20201223_102523.jpg
    241,1 KB · Aufrufe: 225
  • IMG_20201223_102557.jpg
    IMG_20201223_102557.jpg
    217,9 KB · Aufrufe: 242
  • IMG_20201223_142625.jpg
    IMG_20201223_142625.jpg
    164,2 KB · Aufrufe: 262

Eisen

User
I continue with LDS instalation into wing. At the beginnig I had respect from it, but it is much easier than it looks for first time
smile.gif

I use LDS from Tud-modelltechnik system, which comes together with my plane.
Flap horns and ribs for ball bearing were glued from pruducers on right place, which gives you very good startion position for your next work.

Working instruction how I finished it:

1) Put it flap to maximal brake position.
2) Put it servo to maximal deflection for maximal brake of flap.
3) Mark this position on servo gear and excenter.
4) Press excenter on servo gear in marking position. Not by servo screw, but externally into clamp!
5) Check ball bearing if it rotate free, screw witch hold excenter can push on washer and it can make friction on ball bearing!
6) Monting servo on tray and glue.

I don´t say that is best way how to finished LDS system, but it works and I have maximal deflection which can be for brake.
How you can see, I again use servos from KST X10mini.
Next time I wil publish motor mounting.

Milan
 

Anhänge

  • IMG_20201227_120250.jpg
    IMG_20201227_120250.jpg
    124,4 KB · Aufrufe: 242
  • IMG_20201227_120304.jpg
    IMG_20201227_120304.jpg
    96,8 KB · Aufrufe: 251
  • IMG_20201227_121008.jpg
    IMG_20201227_121008.jpg
    164,6 KB · Aufrufe: 231
Ansicht hell / dunkel umschalten
Oben Unten