Hallo aus den USA !!
Ich habe gerade meinen BH Storch gebaut und diesen Thread gefunden. Ich weiß, dass es ein alter Thread ist, aber vielleicht wirst du meine Fotos genießen und kann bestätigen, dass ich den CG (Focus) richtig habe.
Ich plane, meinen CG (Focus) auf 145mm oder 148mm von der Vorderkante der Slat für meinen Maiden Flight zu setzen.
Bitte verzeihen Sie mein Deutsch, da ich diesen Beitrag schreibe, dann mit Google, um es ins Deutsche zu übersetzen.
Mein Storch ist für Segelflugzeug Tug Duty eingerichtet und hat einen Laser 300v in der Nase. Ich denke, ich werde am Ende mit einem 21x6 oder ein 20x8 als die Stütze. Testen wird mir meine endgültige Wahl erzählen. Ich denke, eine Tonhöhe Geschwindigkeit von 50mph sollte viel sein. Klingt das für den Storch?
Ich habe diesen Thread mehrmals übersetzt und gelesen. Ich habe sogar einen guten Freund übersetzt, also habe ich nichts vermisst. Nach all dem habe ich deine Informationen auf eine Grafik gezeichnet und werde das unten posten, damit du sehen kannst, dass ich richtig bin und keine Fehler gemacht habe.
Eine Sache, die ich nicht herausfinden kann, ist, wenn man von QR und LK spricht. Ich habe diese Begriffe im Handbuch meiner AP-Modelle Segelflugzeuge verwendet, aber sie sind nicht ganz klar, welche Oberflächen sie sich beziehen, wenn sie diese Begriffe verwenden. Können Sie diese Begriffe für mich definieren, wie Sie sie verwenden?
Mein Storch:
Ich habe einen Laser 300v installiert und fügte eine Abschleppseil für Segelflugzeug hinzu. Ich fand Col Klink und Sgt Shultz von der TV-Show "Hogans Heros" auf EBay und schneide sie am Taillengelenk ab, um sie in den Stoch zu bringen. Sgt Shultz ist ausgehöhlt, so dass mein Reciever in ihm sitzt und sein Bauch deckt ihn auf. Lol ich habe die BH-Aufzugsdrähte mit Dubro-Stahl-Stößeln ersetzt. Ich kann sie bei Bedarf weiter verstärken, aber sie scheinen stark und funktionieren gut.
Ich verstärkte die Nase als eine übliche Praxis, die ich immer mache und machte neue Schubstangen für den Flügel, indem ich Vollgewinde 4-40 Stange zu Länge mit Alumium Rohr epoxys über die Stange verließ die Enden ausgesetzt. Das sind sehr starke und leichte Schubstangen, die ich bei vielen Modellen benutzt habe. Ich benutze ein Metall Epoxy namens JBWeld.
Ich spritzte das ganze Flugzeug und verwendete Witterungspulver, um die Storch zu bewältigen. Ich bin nicht über Bord gegangen, aber ich wollte einen schönen gebrauchten Look. Ich habe die unteren Flügelspitzen gelb gemalt, um die Storch Kermit Weeks zu replizieren, fliegt hier in Florida, dass dieses Flugzeug nachher modelliert scheint. Dann habe ich Schichten von Clear Klass Kote Epoxidfarbe aufgetragen. Die erste Schicht war sehr flach, die über jeden Teil des Flugzeugs gesprüht wurde, das Leinwand ist. Ich habe den klaren Mantel abgeflacht, so dass es flacher war als normaler Satin und sieht wirklich wie Leinwand aus, wenn er trocken ist. Sobald diese Schicht gehärtet war, klebte ich die Metallteile auf die Abdeckung von BH. Diese Metallteile einschließlich der Motorhaube und Türen, die ich mit Satin Clear Coat besprüht habe. Ich benutze ein sehr unebenes Spray-Muster, so dass man sehen kann, dass einige Ares mehr glänzend sind und einige sind mehr Satin alle auf dem gleichen Panel. Das gibt ein Panel, das uneben aussieht und 3D im Gefühl. Durch die Verwendung des Klarlacks simuliere ich unebene oder verbeulte Panels. Dann habe ich Satin klar Mantel gesprüht traditionell auf die Baldachin Rahmen Arbeit. Dies gibt dem Rahmen einen schönen dummen Mantel, aber glatt in der Anwendung, so dass der Rahmen sieht ein anderes Stück, dass der Rest des Flugzeugs. Schließlich ging ich mit dem Satin zurück und spritzte die Metallteile der Flügel wie die Treibstofftanks.
Also nach all dem klaren Mantel Arbeit der Storch sieht das Leben so gut wie ich es machen kann.
Werfen Sie einen Blick auf meine Zeichnung und stellen Sie sicher, dass ich in der CG und Control Throws ok bin.
Danke dir deine Hilfe. Genießen.
Joe
Google Translate for Business:Translator ToolkitWebsite Translator
===============================================================================
Hello from the USA !!
I have just finished building my BH Storch and found this thread. I know it's an old thread but maybe you'll enjoy my photos and can confirm I have the CG(Focus) correct.
I am planning to set my CG(Focus) to 145mm or 148mm from the front edge of the Slat for my Maiden Flight.
Please forgive my German as I am writing this post then using Google to Translate it into German.
My Storch is set up for Glider Tug Duty and has a Laser 300v in the nose. I think I'll end up with a 21x6 or a 20x8 as the prop. Testing will tell me my final choice. I'm thinking a Pitch Speed of 50mph should be plenty. Does this sound correct for the Storch ?
I have translated and read this thread several times. I even had a good friend translate it so I wasn't missing anything. After all of this I plotted your information onto a graphic and will post that below so you can see that I am correct and haven't made any mistakes.
One thing I can't figure out is when you talk of the QR and LK. I have seen these terms used in the manual of my AP Models Sailplanes but they are not very clear as to which surfaces they are referring to when they use those terms. Can you define those terms for me as you use them?
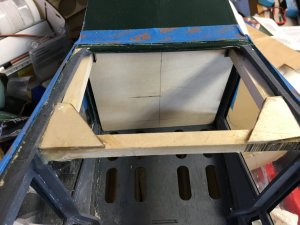
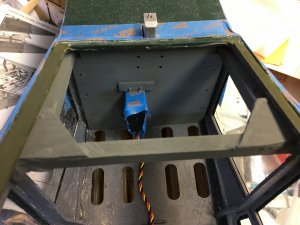
My Storch:
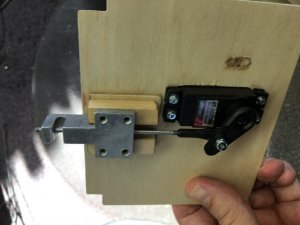
I have a Laser 300v installed and added a tow release for glider towing. I found Col Klink and Sgt Shultz from the TV show "Hogans Heros" on EBay and cut them down at the waist joint to fit them into the Stoch. Sgt Shultz is hollowed out so that my Reciever sits inside him and his belly covers it up. lol I have replaced the BH elevator wires with Dubro steel push rods. I may reinforce them further if needed but they seem strong and work well.
I reinforced the nose as a standard practice I always do and made new push rods for the wing by using fully threaded 4-40 rod cut to length with alumium tube epoxied over the rod leaving the ends exposed. These are very strong and lightweight push rods I've used on many models. I use a metal epoxy called JBWeld.
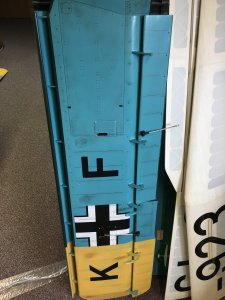
I airbrush the entire plane and used weathering powders to weather the Storch. I didn't go over-board but I wanted a nice used look. I painted the bottom wing tips yellow to replicate the Storch Kermit Weeks flys here in Florida that this aircraft seems to modeled after. Then I applied layers of Clear Klass Kote epoxy paint. The first layer was very flat which was sprayed over every part of the plane that is canvas. I flattened the clear coat so that it was flatter than normal satin and really looks like canvas when dry. Once that layer was cured I taped the metal parts as drawn on the covering by BH. Those metal parts including the cowl and doors I sprayed with Satin Clear Coat. I use a very uneven spray pattern so that you can see some ares are more glossy and some are more satin all on the same panel. This gives a panel that looks uneven and 3D in feel. By using the clear coat this way I simulate uneven or dented panels. Then I used satin clear coat sprayed traditionally on the canopy frame work. This give the frame a nice dull coat but smooth in application so that the frame looks to be a different piece that the rest of the plane. Finally, I went back with the satin and sprayed the metal parts of the wings like the fuel tanks.
So after all this clear coat work the Storch looks life like as best as I can make it.
Take a look at my drawing and make sure I'm doing ok on the CG and Control Throws.
Thanks for your help. Enjoy.
Joe


")
